
Setting up Hadoop on Ubuntu - 1
Hadoop is an opensource framework designed by Yahoo, for running distributed programs. The key feature of Hadoop is something call MapReduce. Basically, any program that you run on Hadoop would be written by implementing a Map and a Reduce method.
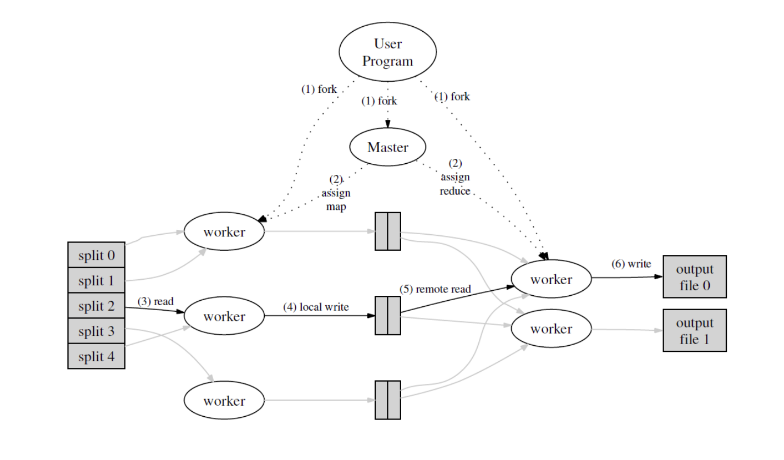
The MapReduce algorithm was created at Google for distributed tasks. Though there is a lot more to cover in this regard, I’ll move on to something more related to this post.
Though Hadoop is a distributed system (which generally implies that it is meant to be run on multiple consumer grade systems), it can be set up in three different modes:
- Single Node: A single node is used to run our program
- Pseudo Distributed: A cluster is setup on a single system
- Fully Distributed: A cluster is setup over multiple systems.
In this first post, I’ll discuss setting up Hadoop in Single Node format on Ubuntu.
Requirements
Setting up hadoop requires a working and of course, compatible JVM. There are several possible options for which ones to use, but at least at the time of writing, Java 8 is recommended with Hadoop 3. You can have a look at this page on the Hadoop website for a better idea of compatibility.
But since we are doing a very basic guide here, I’ll be using Java 11 and Hadoop 3.1.3
Installation
The first step would be see if jvm is running properly. Simply run the command:
$ java --version

openjdk version "11.0.4" 2019-07-16
OpenJDK Runtime Environment (build 11.0.4+11-post-Ubuntu-1ubuntu218.04.3)
OpenJDK 64-Bit Server VM (build 11.0.4+11-post-Ubuntu-1ubuntu218.04.3, mixed mode, sharing)
If you see something that says that java is not installed, please make sure that you do install it. Since, this is not the purpose of this post, I won’t be discussing this part.
If you do get the version in your output (it may not be version 11 for you), lets install hadoop now.
As mentioned above, I will be using Hadoop 3.1.3. Go to the official hadoop website and download the binary for a version which is compatible with your jvm.
Unzip the tar file. I am doing it in my home directory.
$ tar xzf hadoop-3.1.3.tar.gz
Configuration
Now that everything we require has been downloaded, we have to configure quite a few files. We’ll start with .bashrc.
Open this file (its a hidden file most likely in your home directory) in a text editor and add the following exports to it. In bash, assignment only creates a regular shell variable. The function of the export command is to create environment variables out of these shell variables.
# add hadoop home directory
export HADOOP_INSTALL="$HOME/hadoop-3.1.3"
export HADOOP_HOME=$HADOOP_INSTALL

# add hadoop mapred home directory
export HADOOP_MAPRED_HOME=$HADOOP_INSTALL

# add hadoop header files and jar files for compiling our java code
export CLASSPATH="$HADOOP_HOME/share/hadoop/mapreduce/hadoop-mapreduce-client-core-3.1.3.jar
:$HADOOP_HOME/share/hadoop/mapreduce/hadoop-mapreduce-client-common-3.1.3.jar
:$HADOOP_HOME/share/hadoop/common/hadoop-common-3.1.3.jar
:$HADOOP_HOME/lib/*"

# java home
export JAVA_HOME='/usr/lib/jvm/java-11-openjdk-amd64'
Once you are done with the above changes, source the file after saving it:
$ source ~/.bashrc
Now, we’ll move on to Hadoop’s configuration files.
Move into hadoop’s home directory. It’s the same as what you set for $HADOOP_HOME. Then, go to etc/hadoop.
$ cd $HADOOP_HOME/etc/hadoop
core-site.xml
Open this file in an editor and add the following to the end of it.
<configuration>
    <property>
        <name>fs.default.name</name>
        <value>hdfs://localhost:9000</value>
</property>
</configuration>
Do the same for the rest of the files.
mapred-site.xml
<configuration>
    <property>
        <name>mapreduce.framework.name</name>
        <value>yarn</value>
    </property>

    <property>
        <name>mapreduce.application.classpath</name>
        <value>
            $HADOOP_MAPRED_HOME/share/hadoop/mapreduce/*,$HADOOP_MAPRED_HOME/share/hadoop/mapreduce/lib/*,
            $HADOOP_MAPRED_HOME/share/hadoop/common/*,$HADOOP_MAPRED_HOME/share/hadoop/common/lib/*,
            $HADOOP_MAPRED_HOME/share/hadoop/yarn/*,$HADOOP_MAPRED_HOME/share/hadoop/yarn/lib/*,
            $HADOOP_MAPRED_HOME/share/hadoop/hdfs/*,$HADOOP_MAPRED_HOME/share/hadoop/hdfs/lib/*
        </value>
    </property>

    <property>
        <name>yarn.app.mapreduce.am.env</name>
        <value>HADOOP_MAPRED_HOME=$HADOOP_HOME</value>
    </property>

    <property>
      <name>mapreduce.reduce.env</name>
      <value>HADOOP_MAPRED_HOME=$HADOOP_HOME</value>
    </property>

</configuration>
hdfs-site.xml
<configuration>
    <property>
        <name>dfs.replication</name>
        <value>1</value>
    </property>

    <property>
        <name>dfs.permission</name>
        <value>false</value>
    </property>
</configuration>
hdfs-env.sh
You can find the commented export JAVA_HOME line and just uncomment it after adding the path to your jvm. Or could you just add the following line (make sure to add your own path)
export JAVA_HOME=/usr/lib/jvm/java-11-openjdk-amd64
yarn-site.xml
<configuration>
    <property>
        <name>yarn.nodemanager.aux-services</name>
        <value>mapreduce_shuffle</value>
    </property>

    <property>
        <name>yarn.nodemanager.aux-services.mapreduce.shuffle.class</name>
        <value>org.apache.hadoop.mapred.ShuffleHandler</value>
    </property>
</configuration>
Since this is a basic tutorial, we’ll stop configuring at this stage. Hadoop provides several configuration parameters including the memory limit of your node, time limit and some other stuff.
Starting up Hadoop
Now that we configured what we require, we can start up hadoop.
(Note: any commands used below can be added to .bashrc for easier use).
starting up Hadoop components
First, run the following command.
$jps
3403 Jps
It should give you the above output. After this point, any components you start, will be displayed here.
Lets start NameNode and DataNode.
Go to $HADOOP_HOME/sbin and run:
$ ./start-dfs.sh
Now, on running jps, you should see something like this.
$ jps
5074 SecondaryNameNode
5570 NameNode
6185 Jps
4828 DataNode
Do the samething for the other components: the ResourceManager and NodeManager.
Now, jps should give you something like this.
$ jps
7792 Jps
5074 SecondaryNameNode
5570 NameNode
6870 ResourceManager
4828 DataNode
7053 NodeManager
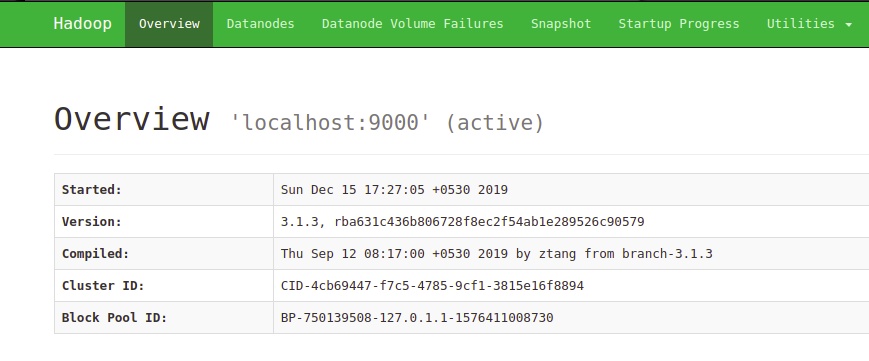
Now, to see if Hadoop is running properly,
open up localhost:9870 and you should see something like this (may vary with Hadoop version).
Going to the Datanodes tab, you should see something like this:
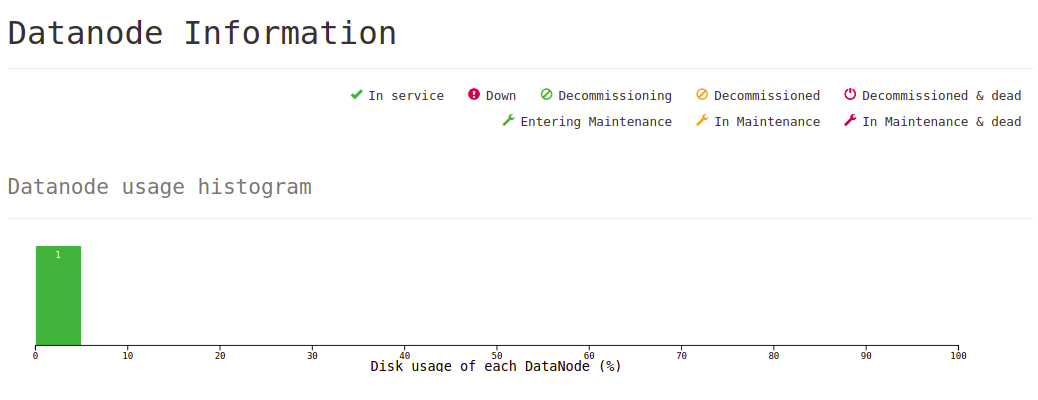
The single datanode in the second image shows that we started a single datanode, which is expected, since we have a single node system.
This post is getting a little too long, so I’ll end it here. Now that we have setup Hadoop in Single Node format successfully, we can try running some simple programs of our own. This will be done in the next post.